Building Modern Storefronts with Fastspring
The no-nonsense opinionated guide to making great online stores
 Written by
Tobias Lønnerød Madsen
Written by
Tobias Lønnerød Madsen
Published Saturday, July 10, 2021
Let's start by asking the most important question; why should we even use Fastspring? If you're like us, you probably have the following headache (or you will in the near future):
How do we deal with paying taxes on our digital sales?
There's two options here:
- Register to pay taxes in all countries you'd like to sell digital products in
- Use a Merchant-of-Record to take care of taxes for you
The latter approach being much more reasonable unless you have the substantial resources to actually register and pay taxes for all territories. And so the next question might then be:
Which Merchant-of-Record provider is the best for us?
With all the options out there today, there are in our opinion, 2 solid contenders to evaluate as of today:
Also an honorable mention to Stripe Tax, but that doesn't (yet) pay the taxes for you, just enable you to do it a bit easier - still too much work for small shops
While Paddle is arguably the more developer friendly of the two, it has several drawbacks which meant that for our storefrons so far, it would not be beneficial:
- Paddle does not have a real cart solution where you can add multiple products to the cart
- Might be worth mentioning that you can "hack" together a cart on your own, but this would require more server-side logic & maintenance
- Paddle does have a coupon system, but only when buying single products, not when hacking together your own cart system
- Paddle does not offer the ability to up-sell to bundles of products
So that leaves Fastspring, which gives us all of this, and more! The one thing lacking is an opinionated A-Z guide to actually get this implemented, so that's why you're here!
General overview - what does Fastspring deliver?
- Sales tax handling: Probably the most obvious, Fastspring acts as a reseller of your products, handling all sales tax in affected territories, letting you focus on your core business
- Popup checkout: No need to leave your store, everything can be handled by a simple popup to enter credit card details
- Cart solution: We want to make it easy to buy multiple products at once, the cart solution does that for us
- Coupons: Implementing our own coupon solution is expensive, Fastspring provides a good service here with everything you might need like timeslots, limited uses and more
- Discounts: Again, dealing with product pricing is a headache, if we can manage it through Fastspring, then that's much better than having to roll our own
- Bundles: Quite often we use bundles as an incentive to buy multiple products together, the Fastspring bundle implementation makes this fairly easy to accomplish, with no fulfillment changes needed
- Up-sells and cross-sells: These are two very powerful tools to increase customer spending and supply better experiences, use them!
- Localized pricing and payment: Depending on where your customers are, they might have access to local payment providers, and will see all pricing in their local currency
With Fastspring offering backend solutions for all of this, all that is left is building out a storefront for customers to interact with your store. Fastspring does also offer a hosted storefront, but we've found it to not be flexible enough at all. That's why we're making this guide to get a good start with the popup store instead.
About this guide
This guide is meant to be a practical guide to dealing with the Fastspring integration on your storefront. It's aimed at developers, so it will not go in depth about the most of the Fastspring features themselves, but provide clear and to-the-point code examples to create a good starting point for your new storefront.
If you want to check out a sample store that is using the code from this guide, head over to https://fastspring-sample-store.månevann.no, the full source can be found here, and should be a valuable source to complement this guide:
If you want to check out some of the stores we've built using very similar patterns, check out Yum Audio or Black Salt Audio!
Behind these storefronts, we have a couple of principles that has shaped the way we like to integrate with Fastspring, generally:
1. The storefront should be fully static
Plenty of reasons for this, primarily the fact that you get cheap and fast hosting for this, and you won't have to maintain backend servers to generate the storefront for you. Also a big win for SEO. This does of course bring limitations, but none that inhibits us from doing this. For our projects, we've been big fans of Nuxt.js, as it allows you to generate static assets for all your pages independently. The rest of the guide will be using Nuxt.js, but the same concepts should easily transfer to Next.js or any other modern framework for that matter. Do a yarn create nuxt-app storefront to get going, then you can follow this guide!
2. Any backend code should be avoided as far as possible
Maintaining servers and backend logic gets expensive, avoid if possible. For my stores so far, we've using simple AWS Lambdas behind API Gateways, and the AWS Amplify framework is a great way to get easy user authentication hooked into any static website! This guide won't require any backend code at all, and depending on your licensing/fulfillment solutions, you might not need any either.
Let's get started!
Before starting coding your store, go get your Fastspring account set up. There's a couple of things you need to get a functioning store:
- Set up your products, and add some sort of fulfillment to these
- Add a popup storefront, and add any products you want visible
- (To go live you also need to sign some contracts)
Hopefully, these two steps should be self explanatory, and with your new popup storefront id on hand, we can start building out our store, so let's get started with the frontend, and see how we'll deal with the Fastspring library.
Dealing with the Fastspring Store Builder Library
The Fastspring Store Builder Library (hereafter SBL) is a fairly old-school library it feels like, where the use cases seem to be oriented around extremely simple websites where the library can directly interact with elements through attribute decorators. That's not what we want for our full-fledged stores, but thankfully we can still get the data we need and use the order logic of the SBL fine without.
When inserted directly, the script will look something like this:
<script
    id="fsc-api"
    src="https://d1f8f9xcsvx3ha.cloudfront.net/sbl/0.8.5/fastspring-builder.min.js"
    type="text/javascript"
    data-storefront="vendor.test.onfastspring.com"
    data-data-callback="dataCallbackFunction"
    data-error-callback="errorCallback"
    data-popup-closed="onPopupClose"
    ...
/>
We've included the must-have attributes in the snippet above, but there are more in case you have more advanced use-cases, take a look here: https://fastspring.com/docs/get-started-with-store-builder-library/
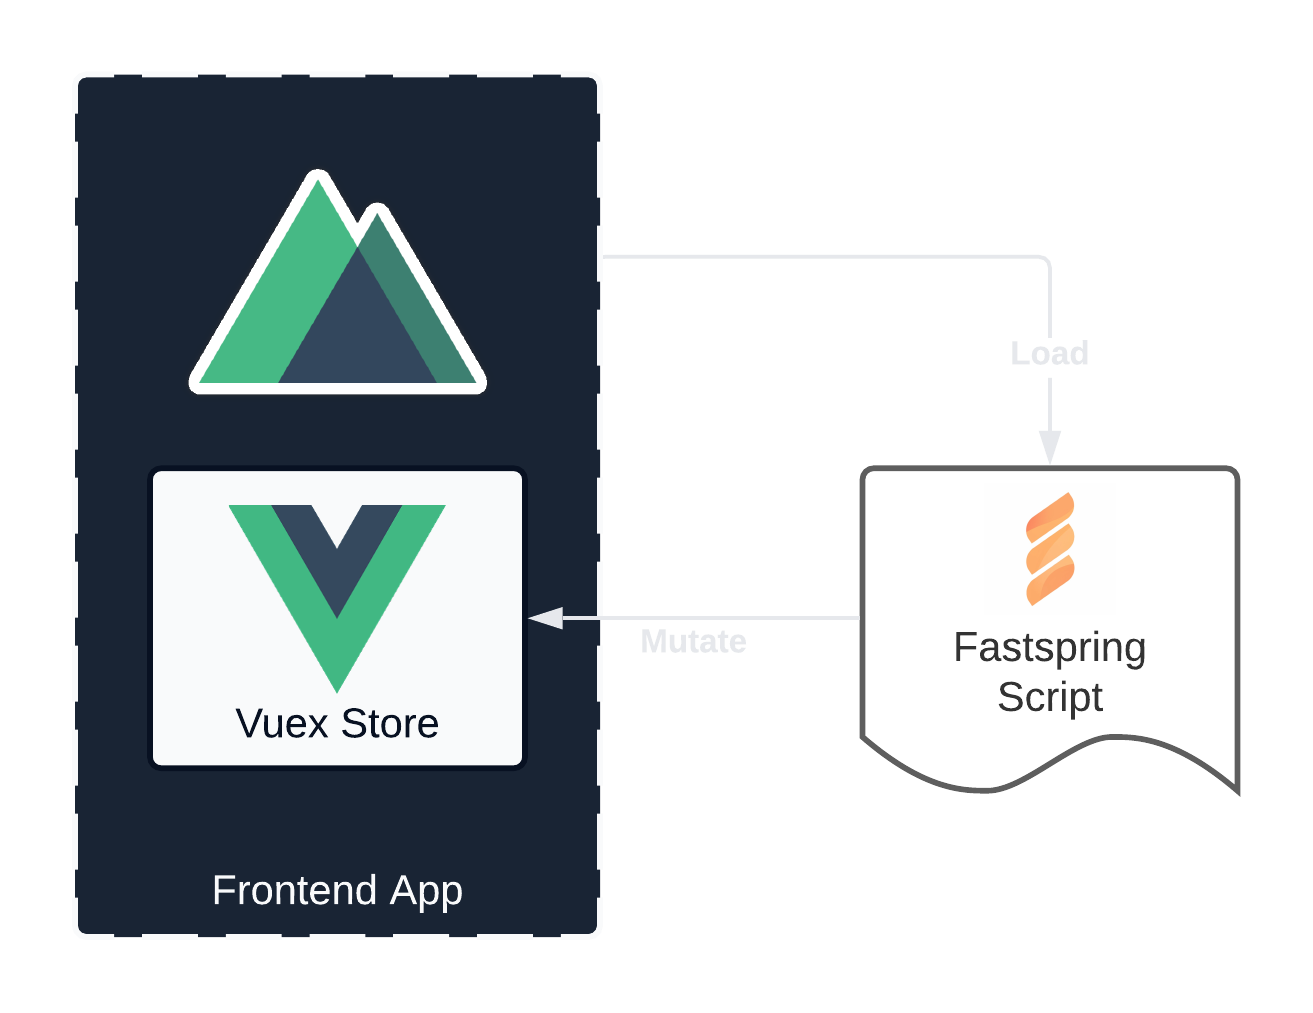
At the end of the day, we usually want to access both order details and product data such as pricing, discounts and assets from different places in our frontend application, so it makes sense to encapsulate the complexity of dealing with this library inside a vuex module.
To achieve this, we've used this simple component that is added to the layouts that we want a store integration on:
<template>
  <div ref="container" />
</template>

<script>
import { mapMutations } from 'vuex'

export default {
  mounted () {
    // We need some global callback functions that the FS script can reference
    window.onFsDataCallback = this.ORDER_CHANGED
    window.onFsPopupClosed = this.POPUP_CLOSED

    const script = document.createElement('script')
    script.src = 'https://d1f8f9xcsvx3ha.cloudfront.net/sbl/0.8.5/fastspring-builder.min.js'
    script.type = 'text/javascript'
    script.async = true

    script.setAttribute('id', 'fsc-api')
    script.setAttribute('data-storefront', this.$config.fastspringStorefrontId)
    script.setAttribute('data-data-callback', 'onFsDataCallback')
    script.setAttribute('data-popup-closed', 'onFsPopupClosed')

    script.addEventListener('load', () => this.INITIATED(window.fastspring))

    this.$refs.container.appendChild(script)
  },
  methods: {
    ...mapMutations('fastspring', ['ORDER_CHANGED', 'POPUP_CLOSED', 'INITIATED'])
  }
}
</script>
As you can see, the script element will be looking for some functions on window, and all of those happen to be vuex mutations. The three mutations we have are simply:
- ORDER_CHANGED: Whenever order data is updated, this mutation updates the state with the new order details. Will load the order once immediately on script load.
- POPUP_CLOSED: This happens when the customer has closed the popup, where the payload will indicate if a purchase has been made.
- INITIATED: Whenever the script is loaded we want to grab the newly injected builder from
windowand stick it somewhere we can use it.
This example is without any error handling!
The mutations themselves can be extremely simple:
const initialState = () => ({
  order: null,
  builder: null
})

const mutations = {
  ORDER_CHANGED (state, order) {
    state.order = order
  },
  POPUP_CLOSED (state, result) {
    // no-op, we mainly just want to subscribe to this for now
  },
  INITIATED (state, fastspring) {
    state.builder = fastspring.builder
  }
}
In the upcoming parts we'll extend this vuex module to get actually do something useful!
Displaying products
To be able to do anything at all, we'd like to get the product data from Fastspring, more concretely the pricing and tax information. The order object stored in our new vuex module will have this, so let's make some vuex getters to make this easy for ourselves:
const getters = {
  products (state) {
    if (!state.order) { return null }
    return state.order.groups.find(
      group => group.driverType === 'storefront'
    ).items
  },
  productByProductId: (_, { products }) => (productId) => {
    return products && products.find(product => product.pid === productId)
  }
}
Side note: having product bundle upsells will slightly complicate the above getters since once you add the bundle to the cart, all products are no longer in the storefront group, but in a group inside the bundle..
Then it's as easy as doing this to access the data in your components:
import { mapGetters } from 'vuex'

export default {
  computed: {
    ...mapGetters('fastspring', ['productByProductId']),
    product () {
      return productByProductId('test-product')
    }
  }
}
With this in place you can access a bunch of different pricing properties in your templates:
{{ product.discountTotal }}: Amount of discount in a localized format (IE: "€ 5,00"){{ product.price }}: Base price in a localized format (IE: "€ 40,00"){{ product.priceTotal }}: Base price * quantity in a localized format (IE: "€ 80,00"){{ product.total }}: Real price (including any discounts) * quantity in a localized format (IE: "€ 70,00"){{ product.unitPrice }}: Real price (including any discounts) in a localized format (IE: "€ 35,00")
Cart
Time to deal with a cart! While you could skip this, and just trigger the checkout to view the cart, we want a rich customer experience, se let us implement our own, starting with another getter on our vuex module:
const getters = {
  // ...
  cart (state) {
    if (!state.order) { return [] }

    const itemsInCart = []
    state.order.groups.forEach((group) => {
      if (group.selections) {
        group.items.forEach((item) => {
          if (item.selected) {
            itemsInCart.push(item)
          }
        })
      }
    })
    return itemsInCart
  }
}
Fairly simple logic here, go over all groups of products, and find all selected products in groups that has any selections, then return a flat list of those.
With this getter in place, it's trivial to build our cart:
<template>
  <div class="cart">
    <cart-item
      v-for="product in cart"
      :key="product.pid"
      :product="product"
    />
  </div>
</template>

<script>
import { mapGetters } from 'vuex'

export default {
  computed: {
    ...mapGetters('fastspring', ['cart'])
  }
}
</script>
The implementation of the CartItem component is left as an exercise for the reader, but you could take a look at the sample store CartItem.vue.
Adding products to cart
Until now, we've only ever read data from the Fastspring state, that's about to change! The way we prefer to do this is by pushing state to the session, and for that we have a very simple vuex action:
const actions = {
  push ({ state }, session) {
    return new Promise((resolve, reject) => {
      if (!state.builder) {
        reject(new Error('Fastspring library not initialized!'))
        return
      }

      state.builder.push(session, (order) => {
        resolve(order)
      })
    })
  }
}
This simple action wraps the SBL builders push method that has a callback in a promise so we can use async/await for modern code elsewhere. The session objects you can push through this method can do everything from identifying customer details to adding/removing products from the cart.
So let's add another action to add any given product to the cart! Sadly, you can't use relative numbers to add/remove products, you'll have to clearly specify the new quantity, so let's do that:
const actions = {
  // ...
  addToCart ({ getters: { productByProductId }, dispatch }, productId) {
    const product = productByProductId(productId)
    return dispatch('push', {
      products: [
        {
          path: product.pid,
          quantity: product.selected ? product.quantity + 1 : 1
        }
      ]
    })
  }
}
If you want to remove something from the cart, just add another action to set quantity to 0!
With the vuex infrastructure in place, our CTA components become very simple:
<template>
  <button @click="addToCart(productId)">
    Add to cart
  </button>
</template>

<script>
import { mapActions } from 'vuex'

export default {
  props: {
    productId: {
      type: String,
      required: true
    }
  }
  methods: {
    ...mapActions('fastspring', ['addToCart'])
  }
}
</script>
Since
addToCartreturns aPromise, you can easilyawaitit and show a loading spinner while it's being added!
Checkout
The SBL builder has a dedicated method to trigger the popup checkout, which makes this very easy, so let's add another action to our vuex module:
const actions = {
  // ...
  checkout ({ state }) {
    if (!state.builder) { throw new Error('Fastspring library not initialized!') }
    state.builder.checkout()
  }
}
This will open the popup where the user can enter any necessary contact details and pay using any locally supported payment providers. When finishing this flow, the cart will be emptied, ready for another order. Fastspring will send the customer an email with an order confirmation as well as any fulfillment actions set up in Fastspring.
If you want to redirect the user to a page or do anything after successful orders, you can merely subscribe to the POPUP_CLOSED mutation we defined earlier.
Conclusion
Hopefully this guide serves as an easy jumpstart to building modern stores with Fastspring, it's really not as hard as it might seem, it's just a matter of navigating a lot of documentation, making sense of the order & product structures received by the SBL.
Do you have feedback or comments on this article? Reach out at hello@moonwater.no.